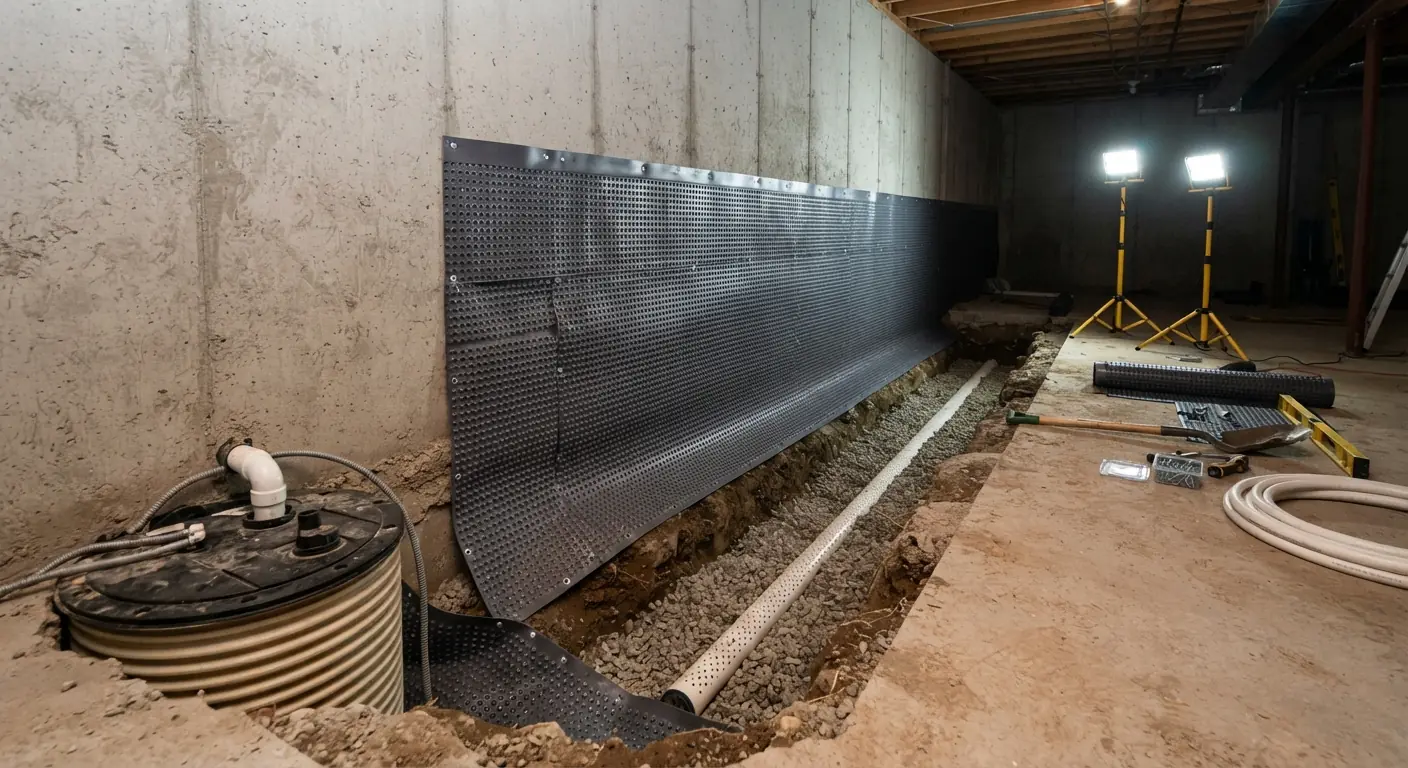
Yes, you can waterproof a basement from the inside. Paint-on sealers handle minor dampness.1 Leaks pushed in by wet soil need an interior drain: perforated pipe in gravel along the edge of the floor, feeding a sump pump that sends the water outside.23 That system manages water after it reaches the wall. When the outside of the wall is damaged, or water has to be kept off the foundation, the fix is digging outside.43
TL;DR
- Find the source before you buy anything. A 24-hour foil test separates seepage from condensation, and condensation is a dehumidifier job.2
- Sealers suit dampness only. Groundwater pressure makes them bubble and peel, and in a 2018 test a paint-type coating leaked with just 2-plus feet of water pressing on it.25
- The lasting interior fix is drain tile plus a sump pump.2 HomeGuide's 2026 figures put interior waterproofing at $6,000 to $12,000 and exterior work at $10,000 to $18,000.1
- Dig outside when the outer face of the wall is damaged or water must stay off the concrete. A bowing wall needs a structural check before any waterproofing.43
- Settle the water before anyone frames a wall, then finish with materials that let the concrete dry toward the room.6
How does an interior basement waterproofing system work?
An interior system lets groundwater reach the inside of the foundation, catches it at the base of the wall and pumps it out. A trench along the edge of the floor holds perforated pipe in gravel. The pipe runs to a sump pit, and the pump sends the water through a discharge line away from the house.37
You'll hear three names for that pipe. Drain tile, weeping tile and French drain all describe perforated pipe laid in gravel.41 An interior drain sits in a trench cut into the basement floor along its perimeter.1 An exterior drain sits outside at the footing, and getting it there takes excavation.2
Here is the cross-section, from the yard to the room.
| Layer | Where it sits | What it does |
|---|---|---|
| Grade, gutters and downspouts | Ground surface outside | Moves roof and surface water away so less soaks in beside the wall2 |
| Foundation wall | Between the soil and the room | Takes the water pressure; cracks, mortar joints and pipe openings let water through2 |
| Cold joint | Where the wall sits on the footing | A weak seam where cracks can develop2 |
| Dimpled membrane or coating | Inside face of the wall | The membrane leaves small gaps for water to travel through; a coating is a barrier against dampness41 |
| Drain tile in gravel | Trench along the inside perimeter of the floor | Collects the water that comes through the wall3 |
| Sump pit and pump | A corner of the basement, below the floor3 | Holds the water and switches on at a set level7 |
| Check valve and discharge line | On the pump outlet | Stops water running back into the pit and carries it away from the house73 |
| New concrete | Over the trench | Closes the floor once gravel covers the pipe3 |
| Dehumidifier | In the room | Pulls out water vapor that still gets through8 |
Follow one heavy rain through it. The soil outside saturates and water pushes against the wall until it finds cracks and the cold joint.2 Inside, it drops into the gravel and the pipe carries it to the pit. When the water reaches a set level, the pump switches on and sends it to higher ground or a storm drain.7 A good system also captures seepage from the wall face and channels it to the same pump.2
The chain has two weak links. The drain can't push water anywhere; it relies on the pump.3 And the pump relies on power. Building Science Corporation's basement digest flags sump pumps failing during electrical outages in a downpour.6 HomeGuide suggests a battery backup so the pump keeps working when the power goes out.7
For a side-by-side of every method, including exterior membranes, read the basement waterproofing methods guide.
Is it normal to get water in your basement after heavy rain?
It's common, and it has a cause worth finding. Basements sit below grade, so soil soaked by heavy rain pushes water through cracks and joints.2 One wall crack can let in an inch or two during a rainy season.2 EPA says drying wet areas within 24 to 48 hours prevents mold growth.9
Start with the foil test. Dry a patch of wall with a rag and tape a 1-foot square of aluminum foil over it. Peel it off after 24 hours. A wet underside means water is seeping through the wall from outside. A dry underside points to condensation from humid basement air, and a dehumidifier handles that.2
Next, find where the water gets in. Wet streaks show up along cracks, at window corners, in the mortar joints of block walls and around pipes that pass through the wall.2 Window wells are a common source of wall leaks.2 Then walk around the house in the next rain and watch where water flows and pools.2
Condensation deserves a real look. Building Science Corporation says the main problem comes in summer, when warm, moist air meets basement walls colder than its dew point.6 For a space where walls or floor sweat or seepage is present, ENERGY STAR recommends a dehumidifier rated at 30 to 50 pints per day for areas under 2,000 square feet.8 Some units take a hose that drains straight into a floor drain or sump pump.8
If water is standing on the floor, turn off the power to the basement before you work down there. Standing water raises the risk of electric shock.2 Have a licensed electrician check any outlet or appliance that got wet.
Can basement walls be sealed from the inside?
Yes, but a sealer handles minor dampness only. Coatings bond to bare masonry and form a barrier against moisture.21 They won't stop water under pressure. When saturated soil pushes water in, that pressure makes sealers bubble, flake and peel.2 Home Depot's pro guide calls interior sealants alone a temporary measure.3
Here's what you can put on the walls, and where each one stops working.
Hydraulic cement for active cracks
Hydraulic cement expands as it sets, so it pushes deep into a crack. Mix only what you can use in 3 minutes, because it starts to set that fast.2 Peter Yost tested fast-patch cements for Green Building Advisor in 2018. His written conclusion was that each one closed off a flowing leak.5 The weakness is the rest of the wall. A foundation repair trainer told Bob Vila that when you plug one crack, the water pressure builds and finds another weak point.2
Masonry waterproofing paint
Masonry waterproofer comes premixed and goes on like thick paint. Brush or roll it heavily enough to fill the small surface holes, let it dry fully, then add a second coat.2 It only sticks well to bare masonry. Old paint has to come off first. So does efflorescence, the white deposit that forms on concrete that stays damp.2
Coverage has to be perfect. Yost found that the tiniest void or missed spot gives water a path.5 His test also showed the gap between a label and a result. UGL Drylok Extreme is backed by its maker for up to 15 feet of water pressure.5 In his test it did not keep water out at 2-plus feet.5 It was one homemade test on concrete block columns, so treat it as a warning sign about paint-type coatings under pressure.
Crystalline coatings
Crystalline coatings grow crystals into the concrete, using the free calcium hydroxide in it.5 In Yost's test, Xypex Concentrate and Koster NB1 Grey both held back 2-plus feet of water.5 They took time on block. Both needed extra steps from the maker and a two-week wait before every leak stopped.5 They're sold through concrete-supply distributors, so you may need to get them through your contractor.5 Like any interior coating, they can fail if the wall cracks later.5
Epoxy crack injection
Epoxy injection fills and seals minor cracks that don't threaten the structure. HomeGuide puts it at $250 to $800 or more per crack.1 A crack that keeps widening needs a structural engineer or licensed foundation contractor before anyone seals it.
Dimpled membrane
A dimpled plastic membrane on the wall leaves small gaps for water to travel through.4 Paired with a perimeter drain, it sends wall seepage down to the pipe and on to the sump.2
One warning covers all of these. Building Science Corporation rules out impermeable interior finishes on basement walls built to dry to the inside. Its list names vinyl wall coverings and oil, alkyd or epoxy paint systems.6 Ask your contractor how the coating they propose fits the way your wall dries.
How do you waterproof a basement foundation from the inside?
Waterproofing from the inside takes seven steps: find the entry points, fix outside drainage, repair cracks, cut a perimeter trench, dig the sump pit, lay pipe in gravel to the pump and pour new concrete. Home Depot's pro guide rates the work advanced and says it runs longer than a day.3
1. Find where the water gets in
Use the foil test, then look for wet streaks at cracks, window corners, mortar joints and pipe openings.2 Your contractor should explain how water is getting into your basement before quoting a fix.1
2. Fix the outside water first
Grade the soil away from the wall at a 6-inch drop over 10 feet.2 Extend downspouts 10 feet from the foundation, and clean gutters once or twice a year.2 HomeGuide puts regrading at $1,000 to $5,000 and replacing downspouts at $220 to $625.1 Home Depot's pro guide notes that a basement needing only damp-proofing may be solved by better gutters.3
3. Repair the cracks
Fill wall cracks before any sealant goes on.3 Hydraulic cement suits active leaks, and epoxy injection suits minor cracks.51
4. Break out a perimeter trench
A jackhammer opens a continuous channel along the inside perimeter of the basement floor.3
5. Dig the sump pit at the same time
The pit goes in a corner, a little larger than the sump tank. Dig it while the floor is already open so nobody breaks concrete twice.3 HomeGuide says cutting through a concrete floor raises a sump installation to $2,500 to $5,000.7
6. Lay the pipe and connect the pump
Perforated pipe goes into the trench and connects to the sump tank.3 The pump gets a discharge pipe that ends away from the house.3 It also needs a check valve, which stops water flowing back into the pit when the pump shuts off.7 Ask your contractor where the discharge will end and what your city allows.
7. Backfill and pour the floor
Gravel goes back over the pipe, then new concrete closes the trench.3 After that, the walls get sealed and any removed wall material goes back up.3
Coatings and crack patches are within reach of a handy homeowner.23 The trench and pump are heavier work, and HomeGuide notes that experienced plumbers install sump pumps.7 Jobs that need heavy equipment may need permits or licenses.3 Your contractor should confirm what your city requires before work starts. Any new circuit for the pump is a job for a licensed electrician.
How do you stop water coming up through the basement floor?
Drain the water out from under the slab. Saturated soil builds pressure that pushes water up through the floor and its cracks.4 A perimeter drain at the footing, running to a sump pump, gives that water a path out.3 Sealers on the floor alone won't hold back water under pressure.1
Rule out the other sources first. Leaky appliances, failed plumbing and overflowing sinks can also put water on the floor.6 A cold slab can sweat in summer when warm, moist air reaches it, which looks a lot like seepage.6 White or gray chalky residue on the floor is one of HomeGuide's signs that water is coming through.1
Well-built basements handle this under the slab. Building Science Corporation calls for crushed stone or coarse gravel under the floor as a capillary break, with polyethylene sheet directly under the concrete as a vapor barrier.6 Connected to the perimeter drain, that stone layer also gives groundwater somewhere to go in a downpour.6 Adding it to an existing house means taking up the floor. In an existing basement, the retrofit is a drain in a trench around the edge of the floor, connected to a sump pump.3 To test the slab and match a sealer or drain to the result, see how to waterproof a basement floor.
Pick a floor finish that lets the slab dry. Building Science Corporation says impermeable floor finishes such as vinyl coverings inhibit drying and typically lead to mold.6
Is it better to waterproof from the inside or the outside?
Inside is cheaper and less disruptive, and it's enough for a sound wall that leaks at joints or small cracks. Outside is the only way to keep water off the foundation, and it's the call when the outer face of the wall is damaged. Home Depot's pro guide says the most thorough jobs combine both.431
| Factor | Interior drain and sump | Exterior excavation |
|---|---|---|
| What it does | Catches water that gets through the wall and pumps it out3 | Keeps water off the outer face of the wall with a membrane and footing drain1 |
| Average total cost (HomeGuide, January 2026) | $6,000 to $12,0001 | $10,000 to $18,0001 |
| Disruption | Floor edge broken out and re-poured inside3 | Excavation around the house's perimeter, which disturbs landscaping1 |
| Extra costs to expect | Sump maintenance plans run $100 to $250 a year7 | Replacing sod and plants runs $300 to $1,000 or more1 |
| Lifespan HomeGuide cites | 20 to 30 years for interior French drains and sump pumps, with regular upkeep1 | 10 to 15 years for exterior membranes1 |
| Best fit | Sound walls, leaks at pipe openings or minor cracks, no room to dig4 | Damage on the outside of the wall, or water that must stay off the concrete43 |
When interior is enough
- Water seeps at specific points such as pipe openings or minor cracks.4
- Water comes in at the base of a sound wall after rain, and a drain can catch it there.2
- There's no room to dig because the next building is close or the yard is paved.4
- The foil test showed condensation. That calls for a dehumidifier and no waterproofing at all.2
When only exterior excavation will do
- The outside of the foundation wall is significantly damaged. An exterior approach may be necessary for long-term protection.4
- You need water kept off the concrete. Sealing or coating from inside will not protect the foundation from contact with water outside, and Home Depot's pro guide recommends an exterior sealant or membrane to prevent long-term damage.3
Either way, a wall that water pressure has bowed needs a structural engineer or licensed foundation contractor first.4 Waterproofing comes after the wall is stable.
Building science favors the outside. Building Science Corporation describes the traditional approach as placing the barrier and control layers outside, then letting the wall dry to the inside.6 An interior system accepts that water reaches the wall and manages it from there. For a sound wall, that trade works. Exterior drain tile also needs a buried sump pump, and Bob Vila's guide says the job can easily run $10,000 or more.2
How much does it cost to waterproof basement walls from the inside?
A full interior system averages $6,000 to $12,000, according to HomeGuide's January 2026 cost guide.1 HomeGuide puts an interior French drain alone at $4,000 to $17,000, depending on basement size and layout.1 Sealing damp walls costs far less, at $2 to $10 per square foot with labor.1
| Item | Price range | Source and scope |
|---|---|---|
| Full interior waterproofing | $6,000 to $12,0001 | HomeGuide, January 2026: average total covering pumps, drains, sealers and crack filling |
| Interior French drain | $4,000 to $17,0001 | HomeGuide, January 2026: trench, gravel, perforated pipe and connection to a sump |
| Sump pump, installed | $600 to $2,5007 | HomeGuide, August 2023: unit plus labor |
| Sump pump where the pit is cut through concrete | $2,500 to $5,0007 | HomeGuide, August 2023: total installation |
| Epoxy crack injection | $250 to $800 or more per crack1 | HomeGuide, January 2026 |
| Waterproof paint or concrete sealing | $2 to $10 per sq ft1 | HomeGuide, January 2026: labor and materials included |
| Waterproof paint | $1 to $6 per sq ft3 | Home Depot pro guide, August 2024: labor not stated |
| Acrylic sealant | $3 to $4 per sq ft3 | Home Depot pro guide, August 2024 |
| Silicate or epoxy sealant | Up to $5 to $7 per sq ft3 | Home Depot pro guide, August 2024 |
| Portable dehumidifier | $130 to $3001 | HomeGuide, January 2026 |
| Whole-house dehumidifier, installed | $1,500 to $3,5001 | HomeGuide, January 2026 |
The two paint ranges disagree. HomeGuide's $2 to $10 includes labor and materials, while Home Depot's $1 to $6 doesn't say what it covers.13 If you're hiring the work, budget from HomeGuide's range because its scope is stated. The sump figures are the oldest in the table, from HomeGuide's August 2023 guide.7
The French drain range reaches well past the full-system average. HomeGuide ties it to basement size and layout, and a longer perimeter means more trench.1 Wall type matters too. Block foundations have more seams and joints where water enters, and stone foundations cost the most.1 On a sump install, labor often makes up 65% to 80% of the total.7 Exterior membranes, exterior drains and regrading are priced in the basement waterproofing cost guide.
What a good interior waterproofing quote shows
A good quote explains how water gets into your basement and prices each part of the fix. Look for crack repairs, drain length, the sump pit and pump, the discharge route and the concrete patch as separate lines. HomeGuide advises getting an itemized estimate, contract and warranty in writing before work begins.1
Questions worth asking before you sign:
- How is water getting into my basement, and how did you confirm it?1
- Are there structural problems that could cause the walls to fail?1
- Does the drain run around the whole basement or only the wet walls?
- Which pump type are you installing? Pedestal pumps last 10 to 30 years on average, and submersible pumps last 5 to 20.7
- Are a check valve and battery backup included?7
- Where does the discharge line end?
- Does the estimate cover materials, labor, delivery fees and cleanup?1
- Does this work need a permit where I live?3
What changes if you plan to finish the basement?
Basement Remodeling Co.'s rule is to settle the water before anyone frames a wall. Wet drywall, carpet and insulation can grow mold and need to come out, so a leak found after finishing means tearing out new work. Once the drain and pump are in, finish with materials that let the concrete dry toward the room.6
Building Science Corporation's guidance for finished basement walls is specific:
- Keep interior frame walls free of plastic vapor barriers so the wall can dry inward. A plastic barrier there often leads to odor, mold, decay and corrosion.6
- Put rigid foam or spray foam against the concrete. Both allow drying, aren't damaged by moisture and don't support mold.6
- Choose floor finishes and lower-wall finishes with flooding in mind, from leaky appliances to surface water.6
If you're planning basement finishing, the moisture check comes first. Basement Remodeling Co. sends your request to one vetted, licensed basement contractor for your metro. That contractor books a free on-site estimate, measures, checks moisture and talks through layout. You get a written, itemized quote, and nothing starts until you sign. When you're ready, get a written quote for basement waterproofing before the framing goes up, or find a basement contractor by ZIP code. If a finished basement has already taken on water, basement remodeling covers the tear-out and rebuild.
For scale, an interior system is a fraction of a typical finish. The site's published finishing ranges, checked September 2026, are $45,000 to $80,000 for a typical full finish in metro Atlanta and $30,000 to $90,000 in metro Denver. A typical 1,000 sq ft finish in Colorado Springs runs $30,000 to $75,000, and a typical full finish in Fort Collins runs $50,000 to $110,000. Each range comes from one local firm's published figures.